Friday, April 19, 2013

Rainbow Quilt Finished!


As you can see we still have snow here.  This quilt makes me feel like it is really and truly spring.

Tutorial - Repairing a Board Book Binding

I have been spending a lot of time spring cleaning lately.  As I looked over my son's board book shelf I found a few that had been chewed on.  It made me a little sad and I was tempted to toss them...but I hate to toss anything that well loved.  Some of these books have made it through 3 children already.   I finally got the idea to try and repair them. What did I have to lose, right?

Here is what you need:

Heavy Cardstock (I got mine at Micheal's)
Scrapbook Paper
Scissors
Gluestick
Packing Tape
Pencil (Optional)
Fine Sharpie Marker
White Craft Paint and Fine Paintbrush (Optional)


1. Pick up your board book with the destroyed or missing binding.  Mine was partially destroyed and so I had to begin by cutting off the remaining binding.  You will also notice that the back cover was had to use my glue stick to tack it down again.


Your book should look like this


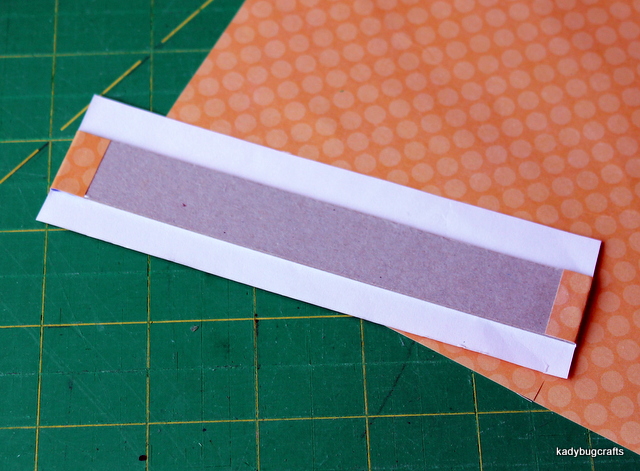
2. Now we will take our book and put it spine down on our cardstock. Trace around the base of the spine with a pencil (my daughter was being my hand model since I have trouble taking pictures and doing the modeling).


Cut out your rectangle.  Now here is where you want to double check the fit.  I like to put the cutout on my board book spine and feel to make sure it isn't hanging over.  I trim the spots were it does.  You could probably also sand it down.  

3.  Put your scrapbook paper face down and put place your cardboard cutout on top of that.  I like to leave about 1/2 an inch border all the way around the cardboard.  Glue the cardboard to the paper.  I now make an "L" shaped cut out or corner cuts at the top and bottom.Fold the paper down onto the cardboard and glue down.  This will give your book spine a more finished look! 


Now fold your paper up on the sides leaving the two sides sticking up.  You actually have two options here.  You can fold the paper sides onto the cardboard and simply affix with a little to your spine.  Or you can place the paper side onto your book and glue down. I will show you what each looks like.

Here it is folded in onto the cardboard. I add a thin boarder of paint next to it to clean up any exposed edges.


Here is the paper coming down onto the book for a little extra clean up I added a white paint border.  The white paint border is actually unnecessary here, I added it for continuity since the front had a thin white border.

 4.  You might have noticed this is also where I add my title.  I wrote mine on in pencil and then traced over them to make sure I centered them.  You could just go for it, stamp one, print it off on your computer, or use scrapbooking letters.

5. Use a long piece of packing tape to cover the whole length of binding.  You might want it a bit longer.  I slowly push it down on both sides to prevent creasing or bubbles.  I then use my craft scissors to cut off the excess tape.  I like the tape because it protects the paper and gives a little waterproofing against my little teether.  


Here you are, they even fit in decently on the bookshelf. 


For a little extra fun you can check out some of our favorite children's books on my pinterest board

Tuesday, February 12, 2013

Love is in the air

Are you doing anything for Valentines day.  I am throwing a party for my kiddos and some of their friends. In between getting games ready and hanging decorations I have been working away on my Farmer's Wife quilt.  I decided to match it with the solstice Stars.  I pieced the top but am not sure it is finished.  I am thinking of appliqueing some hearts in the corners of the white. What do you think?


I also found a saw a tutorial on pinterest for hand stitching ribbon roses onto fabric.  After that an idea started forming in my head.  I took a piece of burlap I had and drew a heart on it in pencil.  I then started sewing roses inside the heart.  I started interspersing some store bought craft roses into the heart for some different dimensions.  I am a little over halfway there and please with how it is turning out!


 Here is a little closer to what it will look like finished.  I planed to hot glue the leaves on.
 

I know!  So many projects and I still need to get some things finished up.  My friend Carrie has made a plan to come over to sew every two weeks.  It it great fun and allows me dedicated time to work on projects and use up my fabric.  Last time we tried to use a bunch of my scraps.  When we were done it didn't look like we had even dented my scrap drawer. ;)  We came up with some great scrappy blankets with help from my kiddos.  I can't wait to share them with you.  Make sure you visit Carrie's website http://www.believemagic.com/journal/  She is currently doing a giveaway for two awesome prizes!

Saturday, February 2, 2013

Sweet Saturday

I am getting closer to finishing my Farmer's wife quilt.  It will be beautiful.  Instead of letting you have a peek at the chosen layout I will instead share with you the cupcakes I made up:


I adore cupcakes!  I really should have taken photos of the second batch I made and decorated.  Hope you are having a sweet weekend.

Monday, January 21, 2013

Monday Monday

I am struggling to find time to keep up with my blog and to finish projects.  I am working on this.  I will continue to share as I finish...it will just be a very crazy year for my family.  I have two pretty stacks of fabric I will not touch until I finish several of my UFO's.  I must finish so I can play!

First up for Christmas my husband I made this quilt for our youngest daughter:


We did a disappearing Nine Patch with Riley Blake's "Apple of my Eye" fabrics.

I have made really good progress on the "Every Which Way" Quilt. This was the quilt I flew solo on for Christmas.  It is a Gigi's Quilt pattern.  It is supposed too be a much smaller quilt and I altered the design just a tiny bit to allow it to be twin sized (omitting two strips and 2 small squares from each block). It should be finished for my oldest son soon.  Here is a peak at it pre-top stitching (which I am free-motion stitching currently).  It insane for me to be free motion quilting a twin quilt on a regular sewing machine!  I do not think it is something I will do in the future.


The third quilt my husband has been working solo on and is really proud of. I picked the pattern and fabrics and he took it and ran.  

It is the Swoon pattern with Gypsy Girl Fabrics for my oldest daughter.  I am not sure how long it will take my husband to complete or if he will ask for my help.  He has made 3 blocks thus far.

I made up a little pillow for my niece who is going to Major in English in college.  I used Fresh Lemon Quilts Autumn Star Tutorial.


I love the fabric I had for the back.  I need to order more!  

For Christmas I also made some ornaments from paper with my children. I found the tutorial for these on Pinterest. 


I made pretty tea bag holders with some scrapping supplies I had in my craft cabinet for my grandmother's package.


Monday, November 12, 2012

November

These days I find myself drinking in as much free time as I can.  Which isn't much.  I think I have mentioned that.  My baby doesn't sleep well.  Nap time and bed time are both hard.  Here is a peek at a few things I did in October and the beginning of November
.

I actually managed to decorate for Halloween!  This is a first for me.  I need more dimensions or levels on the mantel but I was using what I had on hand and not buying anything new. We always dress up, pass our candy, and carve pumpkins.  I just have never really decorated. Thank goodness for free printables.  Next year I plan to make a small quilt to hang and a wreath for our door. 


I got this idea to make miniature (cupcake size) apple pies!  They were so fun!  I am making these again for Thanksgiving.  I used a cupcake liner flattened out on the crust to figure out what size to cut the crust to before putting them in the cupcake pan.


I made some pin toppers for myself!  I saw this craft on Pinterest and had to try it out.  I had never worked with polymer clay before.  I even made a mustache and lip set.  No pictures yet, but they are cute!!


I have managed to make 7 blocks to contribute to our local modern quilt guilds "Film Noir" challenge.  These are 12 1/2 inch blocks in black, white, and grey, with pops of color.


I have a stack of arrows ready to be made into a quilt for my oldest son for Christmas.


I also have a large stack of nine patches sewn together and cut up for my youngest daughter's quilt.  Those are just a small sample of what is in stacks and piles.  I feel like I never have any time or that I can't get anything done, but I make the most of what time I do have. I hope your holiday crafting is going smoothly.

Wednesday, September 26, 2012

Little Quilts


So my stitching is a little crooked.  :)  But I still love my little doll quilt I whipped up for my youngest girl.  I made it from a free pattern offered over at: http://nanacompany.typepad.com/nanacompany/2012/04/a-free-sweet-dreams-little-one-pdf-pattern-.html
We are doing homemade Christmas again this year and I have started with this project.  I love that the Fat Quarter shop now carries the little 2 inch pre-cuts! 


Happily, I finally managed to get this selection of fabric squares off of my cutting board and made into a little baby quilt/playmat or just a happy wall hanging.  I have yet to decide.  I am still also debating on what to back and bind it with. I call it my Square Chalk Box.  Quilting should be done by Friday as long as my littlest is agreeable.  :)  I love my little Cheerio eating monkey.  He captivates me so much of my time an I am more than happy to give him loads of my attention.  They grow so fast!  What takes you away from quilting?